In the excitement of researching and deciding on a new bed, many people overlook the steps needed to put together their purchase, especially if it’s something more advanced than a normal mattress. Sleep Number beds, although not complicated, do require some basic step-by-step tutorial guides in order to ensure the hardware and bed layers, are placed to where they can work correctly.
If you have an impending bed delivery, then you may want to take a glance below which will help take you through the steps of how to put a Sleep Number Bed together. Having a plan in place prior to unboxing your bed is always a great way to help ensure you have stress free experience.
You may be interested in: What is a Sleep Number Bed?
What You Need:
Your Bed Frame:
If you want a set of sheets that are luxuriously soft, lightweight but still warm, this jersey sheet set might work well for you.
Optional Modular Base from Sleep Number:
If you do not want to bother with your own frame or want to use it, but do not feel like you can provide the proper support, you can always purchase one of Sleep Number’s modular bases or FlexFit bases. These can work as a stand-alone, or fit within your own existing bed frame.
Your Sleep Number Bed:
Obviously, your Sleep Number bed is soon to arrive or has arrived, and you should have room for it. As long as your frame and support is set up, you have the space to begin laying out your bed.
You may want to read: How to Move a Sleep Number Bed?
Step 1: Ensure Proper Bed Support

As mentioned above, you do need the proper support for your Sleep Number Bed. If you have purchased a bunkie board, make sure it is set correctly. If you have a base from the company, you will see that these come together simply with the rails snapping easily together. You may need a screwdriver to ensure the legs are on tightly, and if you have a ‘smart’ base, you will have to plug it in as well.
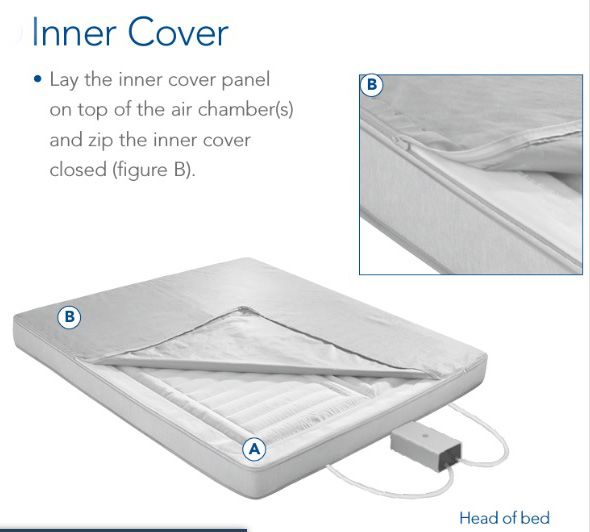
Step 2: Place Mattress Openings at Head of Bed & Unzip Bottom of the 2 Covers

The bottom of your mattress casing will have one, or two openings (depending on whether you have a dual system or not) at the head of the mattress case. You need to place these at the head of the bed in order to assemble your air system up properly.
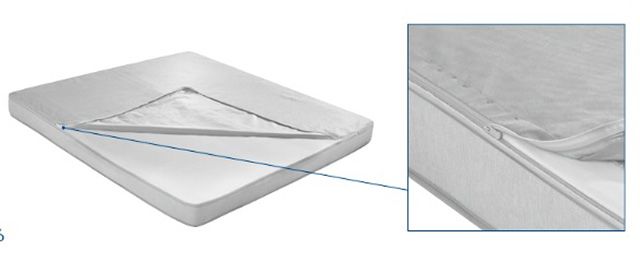
The top of the bed also has two zippers, one atop the other, to access the different chambers of the bed. You need to unzip the bottom zipper and remove the covers in order to properly set up your air technology. This also allows unrestricted access to the bed for comfort and layering.
Step 3: If Applicable: Place Corner Lock System in Place
Some bed sizes, like the double bed, have a corner locking system instead of the notched side walls. These are placed on the bottom of the mattress cover in each corner. Without these your walls will not be stable, so make sure you have them in place. If you have notched side walls, then your bed will not have these locking systems.
Step 4: Place Foam Side Walls
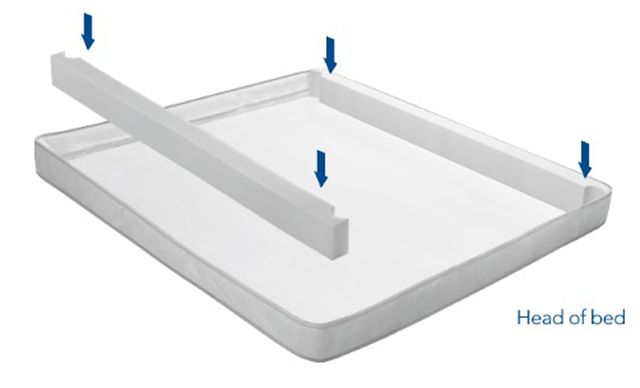
Once you have your top open, you can easily begin to build the structure and support of your bed. First, you want to place the long foam side walls along each side of the bed if you do not have a corner locking system. You want to make sure the notches, located at the ends of each wall, are facing inwards in order to complete the rest of the wall support.
Step 5: Place End Walls
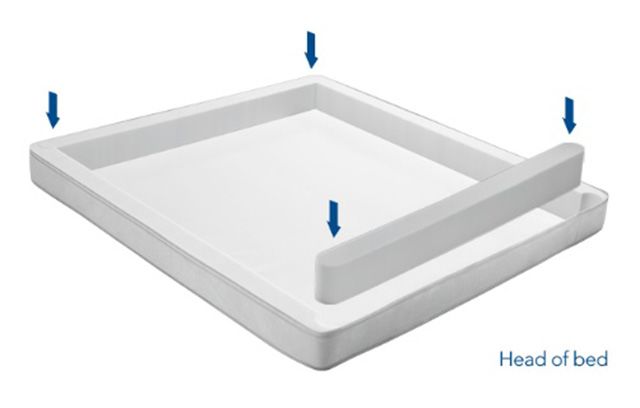
With the long foam walls in place, it helps hold up the structure of the mattress cover better as well, and you can easily slip in the foam walls for the head, and foot of the bed. With these placed properly, you have full access to the inside of the case, and the ability to begin layering the bed.
Step 6: Place Foam Base Pad
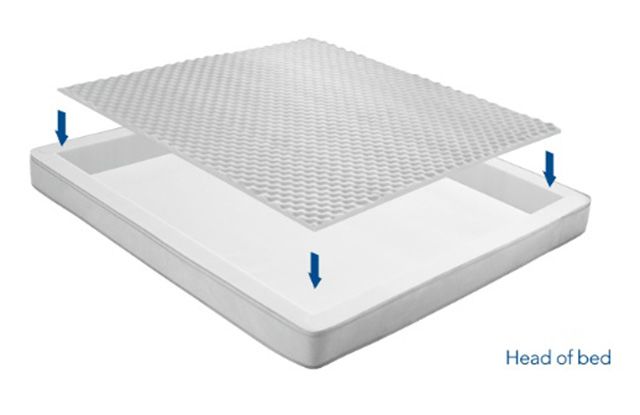
Now, you want to place the foam base pad into the bottom of the cover. Shake it out to keep any foam from folding upon itself and begin to lay it into the bottom of the cover. If there is a textured side and a smooth side, then make sure the smooth side is faced downwards.
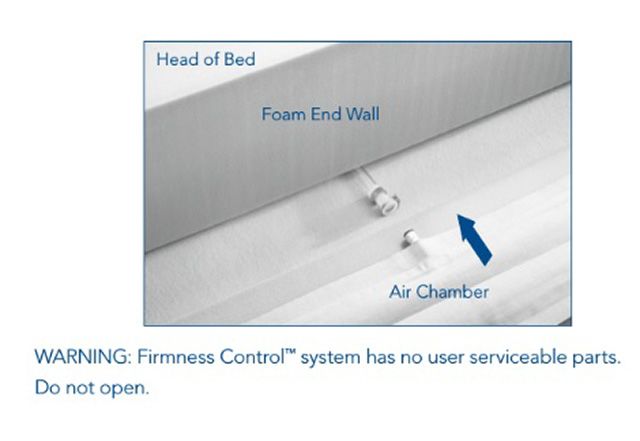
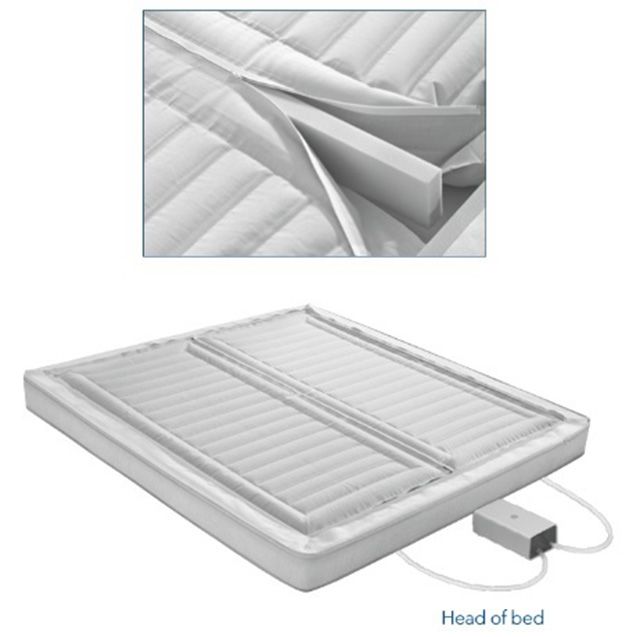
Step 7: Install Air Chambers
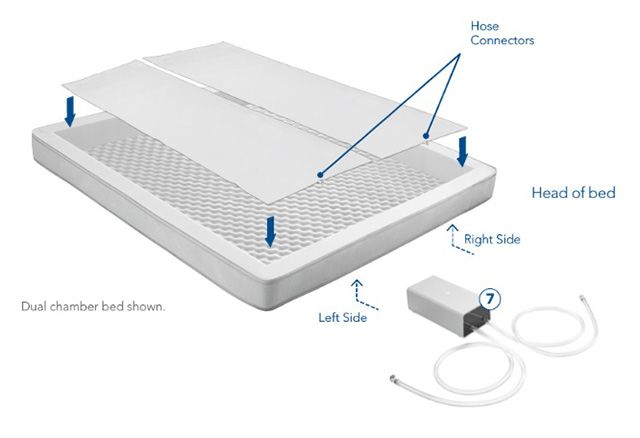
The air chambers come next, and need to be laid over the base pad with the hose connectors facing the head of the bed and are along the bottom where the openings in the mattress casing are. Once these are lying flat, you need to zip them together if you are using a dual system to avoid getting a gap between the two.
Step 8: Set Up Firmness Control System
The Firmness Control System can now be set up and connected to the air chambers. Repeating for the right and left sides of the bed ( or center for single systems), connect the hoses together by pushing them until you hear a click- ensuring they have created a seal. You may have to feed, or pull, part of the hose through the opening, which is why they are there in the first place.
Step 9: Activate Dual Air Technology

Set your system either under your bed near the head, or to the side of your bed, and plugin. Make sure your remote has batteries and/or you have downloaded the app to your Smartphone and followed the online app setup instructions. Then turn on the system and fill both sides to 100. You want to start with your system fully inflated so you can set the rest of your bed layers up the evening before setting your own personal comfort levels later.
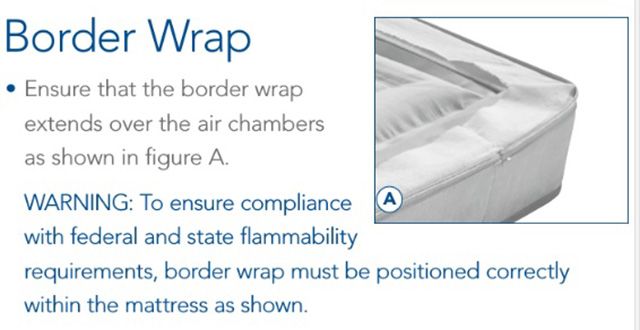
Step 10: Extend Border Wrap Over Walls
The border wrap over the foam border wall to comply with federal and state flammability requirements. This literally pulls over the edges and lays upon the top in a snug, but unsecure fit. This is important for how it fits with the rest of your layers.
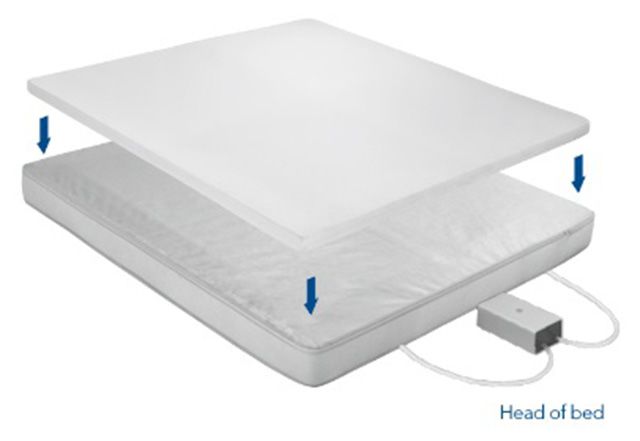
Step 11: Attach the Mattress Cover But Leave Top Section Off
Now affix the bottom part of the mattress cover over the foam borders air system. This helps hold them in place and provides better stability for the above layers. You also will have to unzip the top duvet-like cover and put it to the side of you haven’t already.
Step 12: Place in Foam Comfort Layers
Now you can place the foam layers into the duvet casing. Make sure they are settled evenly, and the smooth side is facing down if you have a foam layer with texture. If you have a bed with a dual layer design you can place either comfort layer on top depending on our own preference, but always make sure the textured side is facing up.
Step 13: Extend Border Wrap Over Foam
The foam border wrap now extends over the entirety of the foam comfort layers. Again, to ensure your bed is in compliance with federal and state flammability requirements, and keep your mattress under warranty- you must have this done.
Step 14: Replace Mattress Cover Top
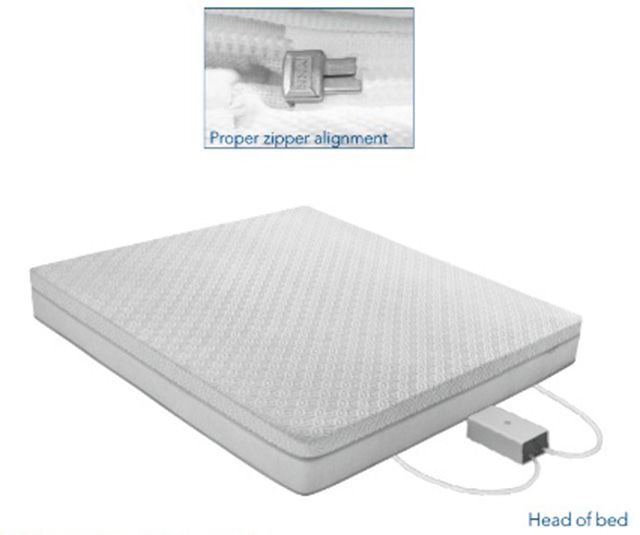
Now you can zip on the top of the duvet cover as the initial comfort surface prior to use. To close properly and easily, make sure the zipper pull is at the head of the bed and completely inserted into the zipper box, then zip closed.
Step 15: Adjust and Enjoy!

Now you can adjust your bed to your preferred Sleep Number Comfort Number, and with the use of the built-in sensors can begin to track your sleep movements, respiration, and heart rate. Allow yourself some time to adjust to a new bed, as well as the time it may take to find your perfect sleep number and comfort preference.
What is so great about the bed is that it can be readjusted as often as you need it depending on the variables that may change in your life- such as pregnancy, body and back pain, injury, or even as simple as something like a sunburn.
Conclusion
Even if you have only been considering a Sleep Number Bed, it is good to know in advance the time and effort it takes to put your bed together. Luckily, as you can see, the design of the bed is fairly simple, and literally layers upon one another easily in order create your bed support. Altogether, the bed arrives well boxed and easy to transport from one room to the next, making it a great choice for smaller spaces. If you need to move your bed at any point, it is also easy to disassemble.
If you have any questions or comments, please let us know below. And, be sure to save and share for future reference!
Frequently Asked Questions
What is a Sleep Number bed?
A Sleep Number bed is an air mattress comprised of many layers and hooks up to a hose and pump. This allows you to easily adjust the firmness of the mattress as you can inflate or deflate the bed to your exact comfort level. The beds have a dual air adjustability feature, which is great for couples because they can individually adjust their side of the mattress to their desired firmness. There is also a smart Sleep Number bed called the 360 Series that comes with Responsive Air technology. The mattress senses your movements and responds to them, automatically adjusting the bed's level of firmness and support.
Can one person set up a Sleep Number bed?
Setting up a Sleep Number bed is super easy, as all the parts click into place and you don’t need any tools. You won’t have any problem setting it up yourself, but for a larger bed like queen or king, you may want someone to help you if you find the parts a bit unwieldly. Including the time it takes to inflate the mattress, the whole process takes about an a hour
Can a Sleep Number bed go on a box spring?
Because a Sleep Number mattress needs to sit on a firm solid surface, a traditional box spring won't work. Instead, you will need to place it on a solid platform, bunkie board or on slats that are not more than two inches apart.
Will a Sleep Number still work when the electricity goes off?
A Sleep Number bed requires electricity to work. However, if the power goes out, the mattress will stay at the same Sleep Number setting it was at before outage, so you can still sleep on it. When the power is restored, you will be able to continue making comfort setting changes with no problem.
Can a bed frame be used with a Sleep Number bed?
A Sleep Number mattress is available in all the standard industry mattress sizes and will fit into traditional frames and furniture sets. You can place the modular base inside a free-standing bed frame or combined with Sleep Number legs and brackets.
Is a Sleep Number bed good for heavy people?
A Sleep Number bed can support up to 400 pounds per air chamber. That means for a dual chamber, a Sleep Number bed can support up to 800 pounds, as long as the people sharing the mattress stay on their separate sides. Additionally, if the mattress is on an adjustable base, it can support up to 600 pounds per air chamber.